"A Grand Experiment in the control of organ pipes." -C. Williams
Here is another example of a MIDI pipe organ driver board resulting from several years of experimentation with MIDI, pipe organs, and the PIC microprocessor. I have had breadboarded versions of the circuit and software running for some time, but this is the first time I have committed the design to a PC board. (I may be committed myself, one of these days.) The design of this board results from several thoughts about MIDI and pipe organs:
In fact, I can just barely manage to play the radio. This means that any pipe organ playing from my basement is going to have to be done by a computer from MIDI files. This will also explain why I am not in a great hurry to design a keyboard scanner. I have collected quite a few MIDI files (about 26,000 of them) and several hundred were written and/or coded for pipe organ. I am not a strict pipe organ enthusiast, so a combination of pipe organ and sound-card seems appropriate to me.
MIDI was invented to control synthesizers. Each MIDI channel can play only one instrument at a time on a soundcard or synthesizer. Sending a MIDI "Program Change" event turns on an instrument. Sending a different Program Change ceases that instrument and starts a new one. If you think of a MIDI channel as equivalent to an organ manual or division, such a scheme would allow only one stop to be drawn at a time. I decided early on that I would allow multiple voices to play on each MIDI channel. Sending Program Control (PC) 15 might turn on 8' Diapason. Sending PC 16 might add a 4' Principal, etc.
If multiple voices are allowed, then you must also have a "Cancel". I use PC 0 to cancel all stops playing on given channel. Orchestrions, band organs, and paper-roll-played pipe organs often used the "lock and cancel" system. Individual holes turned on instruments, a single hole canceled them. This scheme could work for my MIDI board, but it really isn't good enough. If you have several stops drawn and wish to drop one of them, you would send PC 0 and then send the Program Changes for all but the stop you wished to drop. Clearly this would be tedious at best.
My answer was to use a second set of Program Changes to turn off individual stops. MIDI allows 128 Program Changes (which I number 0-127). If PC 1 turns on 16' Bourdon, I make PC 65 turn off 16' Bourdon. Each PC 1-63 turns on a stop and 65-127 turns off the corresponding stop. Since PC 0 cancels all stops for a channel (a "divisional cancel"), I use PC 64 to turn off all stops on all channels (a "general cancel").
The greatest advantage to using Program Changes to change voices is that this fits the way MIDI is normally organized. Furthermore, MIDI sequencer programs allow you to create custom files of names for MIDI voices. I have created files of custom names for both Power Tracks and Cakewalk. When I edit my MIDI files the Program Change entries have the organ stop names.
The disadvantage of this scheme is that you are restricted to 63 stops, (63 on, 63 off, plus 2 cancels). 63 stops may sound like a lot to a hobbyist, but we all like to think big, don't we? There are several ways around this limitation, including MIDI bank switching.
MIDI files usually play like a band or orchestra. Each MIDI channel has the notes for one instrument, and up to 15 instruments may play different melodic lines. (Remember channel 10 is normally reserved on soundcards for percussion). Since I am basically lazy, I would like to use my 26,000 MIDI files without having to re-arrange them extensively to fit my pipe organ. This means that I would like to treat each rank of pipes as a separate instrument.
To do this, I plant my pipes on "unit" chests, where each rank has its
own control board. Each control board has a pair of "Address Switches"
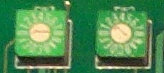
which set the first MIDI Program Change number to which it will respond.
Each board also has an "Option Switch" to set how it acts:

An Option Switch setting of zero means the board will respond as a
Unison rank. (A Table showing the currently
used Option Switch settings appears at the bottom of this page)
If a board is connected to an 8' Diapason rank, and the address switches are set to 7, then sending PC 7 on MIDI channel 3 (for example) will cause the 8' Diapason to play the notes subsequently received on channel 3. Here is a diagram showing a MIDI source (a keyboard) and a YAPPI control board wired to a 73 note chest playing its pipes in Unison with the keyboard. Pressing low C on the keyboard will cause the pipe wired to Output 1 to sound. If the keyboard can only generate 61 MIDI note values, then only 61 pipes will sound.
The tricky part is what happens if now you also send PC 7 from MIDI channel 5. Notes on channel 5 will also play on the 8' Diapason. Sending PC 7 "couples" the 8' Diapason to any channel from which PC 7 was sent. Likewise, sending PC 71 (7+64) will cancel the 8' Diapason on the channel from which it was sent. The interface board is also able to keep track of which notes are playing on which channels. If the same note is played from 4 different channels at the same time, it will continue to sound until all 4 channels cease holding it.
Remember that not only may one rank be played from more than one channel, but that many ranks may be played from each channel. In a MIDI file, channel 1 might be a Melody line and turn on 8' Diapason (with PC 7), 4' Bourdon (PC 4), and 2' Piccolo (PC 6). Channel 2 might be a Bass line and turn on 16' Bourdon (PC 1) and 8' Diapason (PC 7). The 8' Diapason rank will respond to notes from channels 1 and 2 and each channel can play an ensemble of ranks.
A YAPPI board may turn a rank of pipes into more than one instrument.
The next diagram shows Option 2 selected:

An early question was how many outputs to have on one board. A "normal" organ rank today is 61 pipes. Many (older) organs regularly had 73 notes per rank so that the octave coupler would not run out of pipes. (I believe the AGO had a standard in the 1920's stating that all ranks should have 73 notes). I decided on 73 notes as a compromise.
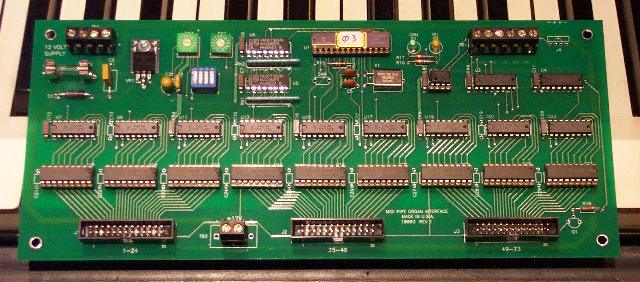
My board has 3, 26 pin output connectors on it. Each handles 2 octaves, plus the lowest note on the next connector. Thus connector 1 has outputs 1-25, connector 2 has 25-49, and connector 3 has 49-73. But not all ranks are 73 notes. The best example is the "unit flute", often of 97 notes, spanning the pitches 16'-8'-4'-2'. Commercial providers of pipe driver boards supply them in different sizes, which I simply cannot afford to do. Instead of this, I handle the 'wide' ranks in software. In the case of the "unit flute", I simply use two controller boards. Two of my built-in options are set up for this special case. Option 6 is for the board driving the 24 notes of the 16' and 8' octaves (24 pipes) and option 7 is for the board driving the 4' and 2' registers (73 pipes).
Other options allow for cases of 85 notes where 73 notes are controlled from one card and the octave below is controlled from the upper 12 outputs of another board. At the end of this article is a Table showing all of the control Options I have defined (so far). A little thought and juggling of Option and Address switch settings should allow you to accommodate most situations. Later, I will give examples of how to design a complete installation using these boards.
I won't enter into the ancient argument about "straight" versus "unit" organs. Most hobbyists can afford a limited number of ranks and wish to get out the most music possible. Deriving too many voices from a small number of ranks is not musical, but almost nobody objects to a limited number of "borrowed" voices.
The MIDI communications standard uses an optically isolated current loop to communicate between modules. This means that each MIDI device connects to one other by means of a cable with 5-pin connectors on each end and that all devices must be connected in series ("daisy-chained"). I have departed slightly from this by using RS-422 drivers and receivers (as used in your Ethernet card). The advantage is that simple 3-wire cable may be used to connect my controllers and they need not be strictly connected in series. RS-422 is highly noise-immune and is supposed to be reliable to a distance of 1000 meters (in case someone wants to have an Echo organ in the next county). I have a small translator card plugged into the "game port" of my sound card to translate the (TTL level) MIDI signal to RS-422.
I want to be able to try different things. These controller boards are
programmable in several different ways: the address switches choose different
Program Change responses and the Option Switch select different output
mode. So far I have created 8 setup options to handle most of the wiring
possibilities one might run into. All of these functions for the controller
are programmed into the PIC16C66 microprocessor found on each board.
I chose this computer because it is a popular industrial part and easily
available. It is built by Microchip, Right now I use the version where the program can be erased and changed. Another version may be programmed only once, but is less than half the price of the eraseable version. I always have a socket on the control board to be able to change the part.
A straight chest has multiple ranks played from one set of note inputs with stops selected separately. In progress is the software to handle this. One output board will be the "stop selector". This board would respond only to Program Changes. PC 1 would turn on output 1, PC 2 would turn on output 2,etc. PC 65 would turn off output 1, etc. This board would control all straight chest stop inputs for the entire organ. One additional board would be used at each straight chest to turn notes on and off. The code for these options is not yet available.
The interface board uses 2, 26-pin headers which receive ribbon cable connectors. I use ribbon cable to wire from these connectors to the chest magnets. Ribbon cable is normally available in 28 AWG in either grey or color-coded. Terminating 28 AWG wire is a little difficult unless you have a wire stripper which melts the insulation instead of cutting it. What is not generally known is that 3M makes 26 AWG, color-coded ribbon cable. Here is a datasheet for it. The price is about double that of 28 AWG, but it is much easier to terminate.
Ribbon cable terminations allow you great flexibility in making connections. A common situation is where the lowest octave of an 8' (or 16') stop is on an offset chest with the upper 61 notes (or 49 notes) on the main chest. I split the ribbon cable for the connector for notes 1-24 and crimp on a 15-pin DB connector to the 1-12 side. The mating 15-pin DB connector is crimped to a 12-wire ribbon cable going to the offset chest.
|
|
|||||
|
|
|
|
|
|
|
| Unison |
|
|
|
|
|
|
|
|
|
|
|
|
| Unison |
|
|
|
|
|
| Octave |
|
|
|
|
|
|
|
|
|
|
|
|
| Sub-oct. |
|
|
|
|
|
| Unison |
|
|
|
|
|
| Octave |
|
|
|
|
|
|
|
|
|
|
|
|
| Sub-octave |
|
|
|
|
|
| Unison |
|
|
|
|
|
| Nazard |
|
|
|
|
|
| Octave |
|
|
|
|
|
|
|
|
|
|
|
|
| Unison |
|
|
|
|
|
| Extra octave |
|
|
|
|
|
|
|
|
|
|
|
|
| Unison |
|
|
|
|
|
| Octave |
|
|
|
|
|
| Extra octave |
|
|
|
|
|
|
|
|
|
|
|
|
| Unison2 |
|
|
|
|
|
| Octave2 |
|
|
|
|
|
| 16' |
|
|
|
|
|
| 10 2/3' |
|
|
|
|
|
| 8' |
|
|
|
|
|
| 5 1/3' |
|
|
|
|
|
|
|
|
|
|
|
|
| 16' |
|
|
|
|
|
| 10 2/3' |
|
|
|
|
|
| 8' |
|
|
|
|
|
| 5 1/3' |
|
|
|
|
|
| 4' |
|
|
|
|
|
| 2 2/3' |
|
|
|
|
|
| 2' |
|
|
|
|
|